Launching ANDI
Navigate to the page to be tested. Launch ANDI by clicking on the favorite/bookmark labelled "ANDI". ANDI will be inserted onto the page. Get Installation Instructions
If you are experiencing issues launching ANDI please visit the FAQ.
Element Highlights
After ANDI has finished scanning the page, all focusable/interactive elements will be given visual highlights.
Focusable Elements:
 Focusable elements will be highlighted with an orange dashed outline (1 pixel thickness) signifying that some
accessibility markup was found for the element. A tester should inspect these elements to determine if the
ANDI Output is appropriate for its context in the page.
Focusable elements will be highlighted with an orange dashed outline (1 pixel thickness) signifying that some
accessibility markup was found for the element. A tester should inspect these elements to determine if the
ANDI Output is appropriate for its context in the page.
Focusable Elements with Danger Alert: 
 If ANDI has found a high priority level
Accessibility Alert associated with an element,
the element will be highlighted with a red, dashed outline (3 pixel thickness).
If ANDI has found a high priority level
Accessibility Alert associated with an element,
the element will be highlighted with a red, dashed outline (3 pixel thickness).
The Active Element:
 As a user navigates the test page
ANDI will inspect the element that has
focus or is hovered over with the mouse. The element being inspected is called the
"Active Element" and will be highlighted with a pinkish-purple solid outline (4 pixel thickness).
The Active Element's accessibility markup will be displayed in the
Accessibility Components section
and its text alternative computation (what a screen reader would say) will appear in the
ANDI Output section.
As a user navigates the test page
ANDI will inspect the element that has
focus or is hovered over with the mouse. The element being inspected is called the
"Active Element" and will be highlighted with a pinkish-purple solid outline (4 pixel thickness).
The Active Element's accessibility markup will be displayed in the
Accessibility Components section
and its text alternative computation (what a screen reader would say) will appear in the
ANDI Output section.
Active Element Inspection
This section allows a user to see accessibility information for the Active Element.
As an element on the page is focused on or hovered over, this section will be updated with information for that element. To prevent this section from updating on mouse hover, hold the shift key (Hover Lock).
This section displays the Element tag name or role, Accessibility Components, ANDI Output, and any Alerts associated with the Active Element.
Element Name / Role
ANDI displays the HTML tag and ARIA role of the Active Element.

This item also functions as a link which, when followed, will shift the focus to the element's location on the page. Hovering over this item will draw a "laser" which points to the location of the element on the test page.
Accessibility Components Table
ANDI performs an automated scan of the test page and searches for HTML tags and attributes that impact accessibility. These tags and attributes are referred to as Accessibility Components and are presented in a table.
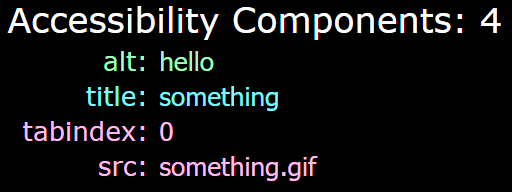
Some components scanned for are:
aria-label, aria-labelledby, aria-describedby,
alt, title, <caption>, <figcaption>,
<label>, <legend>,
innerText.
For more information about Accessibility Components, see the Developer Guide.
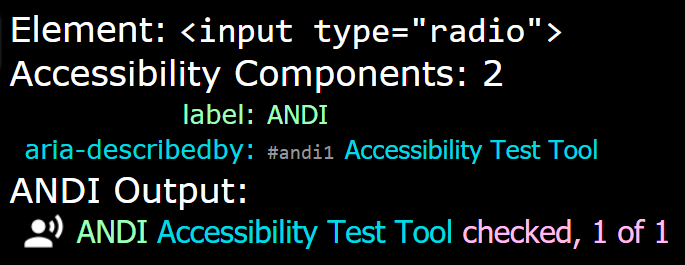
ANDI Output
ANDI's Output displays what a screen reader should read audibly which is the accessible name and accessible description. It will also include some phrasings depending on the presence of certain states and properties plus any associating Accessibility Alerts that ANDI has detected.

The ANDI output calculation is based on the Accessible Name and Description Computation, the HTML Accessibility API Mappings, and where specifications are unsupported or vague, thorough analysis of modern screen reader behavior.
Alerts in the Output
Alerts appearing in the Output link to a help page with information about the Alert.
Difference Between Screen Reader Output
Users can expect that ANDI's accessible name and description Output is accurate and should be voiced by screen readers that follow standards.
Screen readers will often add additional verbiage on certain elements such as "button" for buttons and "graphic" for images. ANDI does not incorporate these phrasings and only outputs the text of the components. For example, if the word "button" is in the accessible name or description of a button, a screen reader will most likely say "button" twice, ANDI would not.
Page Analysis
After ANDI has analyzed the page, it will present results in the Page Analysis section.

Appearing in this section are the Total Elements Found, Previous/Next Element Buttons, Additional Page Details, and The Accessibility Alerts List.
Total Elements Found
ANDI will display the total number of elements found on the page, The element types depend on the module selected.
Previous/Next Element Buttons

When pressed, focus will shift to the highlighted element which precedes or follows the active element based on the page's HTML structure; essentially the "previous" or "next" element that ANDI has analyzed.
Additional Page Details
Depending on the module selected, there may be additional results displayed in this section. For example: accesskeys, table list, links list, graphics details.
For more information refer to each module's documentation.
Accessibility Alerts
When ANDI is launched, HTML elements are analyzed for common accessibility issues. When issues found, ANDI generates an Alert that pinpoints potential accessibility issues.
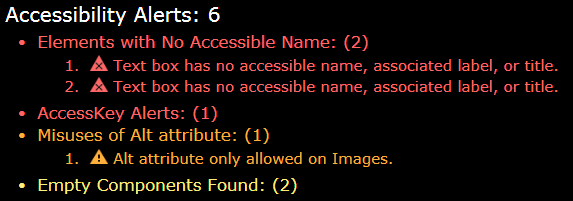
Alerts are contained in the Accessibility Alerts list. The alerts are categorized into three Alert Levels which indicate the likelihood that an accessibility defect is present:
- Danger (red, X icon) - almost certain likelihood of an issue
- Warning (orange, ! icon) - likelihood of an issue or inconsistent behavior with screen readers
- Caution (yellow, ? icon) - needs further investigation
Alerts in the list are organized into groupings. Expanding a group reveals alert messages specific to elements on the page. The messages are links that when followed will place focus on the element to which the alert associates.
Alerts associating with the Active Element will appear in the ANDI Output. Activating an alert in the ANDI Output will open an Alerts Help page which provides details about the specific Alert and remediation steps.
Module Selection Menu
When ANDI is first launched, it scans for focusable/interactive elements. To test other areas of accessibility, ANDI features the ability to launch specialized "modules".
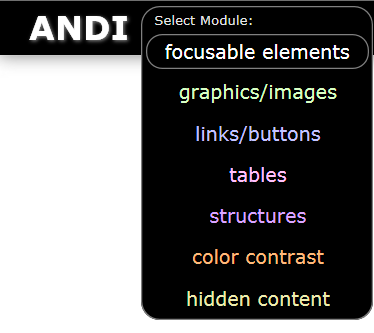
See the Modules Help page for more information about each module.
Controls / Settings Buttons
Controls and Settings buttons are found in the in the upper right corner of ANDI's display.

The buttons are as follows: Relaunch, Advanced Settings, Hotkeys, Help, and Close.
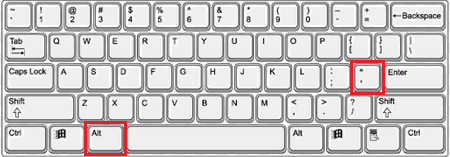
Refresh
 To run ANDI consecutively on a test page, press the
refresh button. Alternatively, alt+=
or pressing the browser's favorite/bookmark button labeled "ANDI"
will relaunch ANDI.
To run ANDI consecutively on a test page, press the
refresh button. Alternatively, alt+=
or pressing the browser's favorite/bookmark button labeled "ANDI"
will relaunch ANDI.
When ANDI is refreshed it will first remove the ANDI Bar from from the page along with markup it added to the test page and restart afresh. There should be no need to refresh the test page and then refresh ANDI.
Advanced Settings
Pressing this button will open a menu with some settings for advanced users.
Hotkeys List Button
Pressing the Hotkeys List button will cause a list of ANDI's hotkeys to appear for quick reference.
Help Button
Pressing the Help button opens up ANDI Help (the site you are reading now) in a new window.
If this button is pressed when a module other than "focusable elements" has been selected, it will open the Help for that module.
Close Button
Pressing the Close Button will remove ANDI's display from the page along with all markup it added to the test page. Navigating away from the Test Page or hitting the browser's refresh button (F5) will also remove ANDI.
Version Popup
By clicking the "ANDI" heading text in the upper left of the ANDI Bar, a popup will be displayed containing the version number of ANDI and the module version number.
Advanced Settings
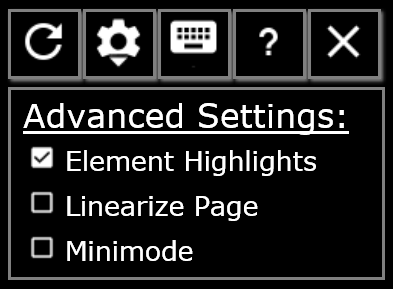
Element Highlights Toggle
This setting will allow a user to hide or show the Element Highlights (outlines) on the test page.
All functions of ANDI remain with the highlights turned off; this control is strictly cosmetic.
An ANDI user who is visually impaired can find similar information that the highlights indicate in the ANDI Output section.
When performing a test of visual indication of focus, it is best to have this setting off or not have ANDI launched.
Note: The ability to turn off element highlights is not available in pages rendered in Internet Explorer 7 or less compatibility modes.
Linearize Page Option
This setting will "linearize" the page by searching for elements that have been positioned with CSS, and repositioning them in the order in which a screen reader would detect them.
Elements that have been repositioned will have a teal colored halo around them.
This can be useful when testing the meaningful sequence of elements on the page.
MiniMode Display Option
This setting condenses ANDI so that more of the test page is visible.
When MiniMode is ON, ANDI's display will appear as follows:
- The Accessible Components Table and Page Analysis section (All Alerts) will be hidden.
- The Element Name/Role, Output (including alerts associating with that element), and Settings/Controls Buttons, Next and Previous Element buttons, and Module Selection Menu will remain visible.

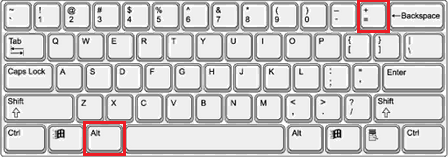
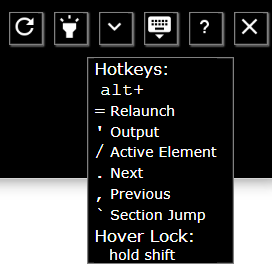
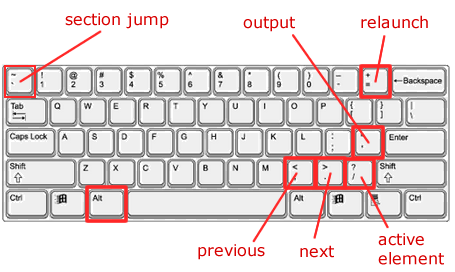
Hotkeys
ANDI has a few built-in hotkeys (also known as shortcut keys) to aid a keyboard user in quick navigation.
alt+= |
Relaunch |
|
|---|---|---|
alt+' |
Output Jump | |
alt+/ |
Active Element Jump | |
alt+period |
Next Element | |
alt+comma |
Previous Element | |
alt+grave accent |
Section Jump |
NOTE: Firefox browser uses shift+alt for hotkeys.
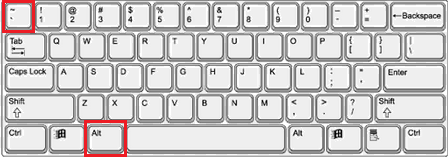
Refresh alt+=
To run ANDI consecutively on a test page, simply press the
hotkey (alt & equal sign). Alternativly, pressing the browser's favorite/bookmark button labeled "ANDI"
can relaunch ANDI.
When ANDI is refreshed it will first remove the ANDI Bar from the page along with all markup it added to the test page and restart afresh. In other words, there is no need to refresh the test page and then relaunch ANDI.
This Relaunch hotkey has the same function as the Relaunch Button.
Output Jump alt+'
 This hotkey (alt & apostrophe) will shift the focus to the ANDI Output.
If a screen reader is being used, it would then read the text of the Output.
For a visually impaired user, this is very useful when paired with the Active Element Jump hotkey.
This hotkey (alt & apostrophe) will shift the focus to the ANDI Output.
If a screen reader is being used, it would then read the text of the Output.
For a visually impaired user, this is very useful when paired with the Active Element Jump hotkey.
Active Element Jump alt+/
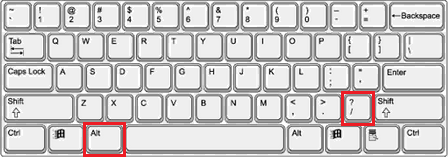 When this hotkey (alt & forward slash) is pressed
the focus will shift to the Active Element on the test page.
For a visually impaired user, this is very useful when paired with the Output Jump hotkey.
When this hotkey (alt & forward slash) is pressed
the focus will shift to the Active Element on the test page.
For a visually impaired user, this is very useful when paired with the Output Jump hotkey.
Next Element alt+period
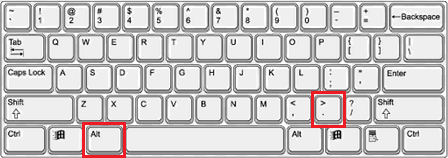 When pressed, focus will shift to the highlighted element which follows the active element
based on the page's HTML structure; essentially the "next" element.
When pressed, focus will shift to the highlighted element which follows the active element
based on the page's HTML structure; essentially the "next" element.
Previous Element alt+comma
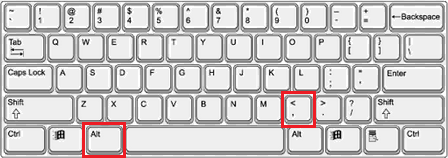 When pressed, focus will shift to the highlighted element which precedes the active element
based on the page's HTML structure; essentially the "previous" element.
When pressed, focus will shift to the highlighted element which precedes the active element
based on the page's HTML structure; essentially the "previous" element.
Section Jump alt+`
 Repeatedly hitting this hotkey (alt & grave accent) will allow a user to jump between four sections in order:
- The ANDI logo (the "beginning" of ANDI)
- The Controls Settings Buttons (upper right)
- The Active Element Inspection Section (left)
- The Page Analysis Section (right)
Mouse Controls
Lasers
ANDI has the capability to overlay the test page with a "laser" for the purpose of quickly pointing out the location of associated elements.
Tag Name Laser
When using the mouse to hover over the Element Name in the Active Element Display, a laser will appear on the test page which points at the location of the element that is being inspected in the Active Element Display.
Alert List Lasers
A laser appears when holding the shift key and using the mouse to hover over Alerts in the Alerts List.
Component Lasers
Hovering over the
aria-labelledby, aria-describedby, or <label>
component text in the
Accessibility Components Table
will draw a laser which points to the associated element from where the text was retrieved.
Additional Notes:
The lasers will not persist on the screen. i.e. the moment a link is clicked or the mouse moves off the link, it will disappear. It is possible to take a screen shot while the laser is on screen during mouse hover by hitting the keyboard's Print Screen key.
Since ANDI's lasers are built using SVG (scalable vector graphics) ANDI's lasers will not work in versions of Internet Explorer prior to 9 (including compatibility modes).
Hover Lock
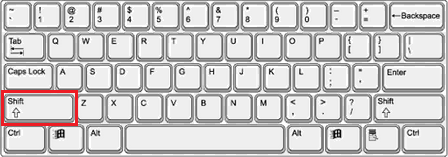 When using the mouse to hover over elements on the test page,
holding down the shift key will "lock" the Active Element
display. While holding down the shift key, if the mouse cursor passes over other elements,
the Active Element Display will not change (by design).
Releasing the shift key will allow the user to change the Active Element being inspected, as normal.
When using the mouse to hover over elements on the test page,
holding down the shift key will "lock" the Active Element
display. While holding down the shift key, if the mouse cursor passes over other elements,
the Active Element Display will not change (by design).
Releasing the shift key will allow the user to change the Active Element being inspected, as normal.
Concurrent Use
With Screen Readers
ANDI is fully accessible and can be used concurrently with a screen reader.
With Developer Tools
ANDI can be used concurrently with an inspection tool such as a browser's Developer Tools.
Artifacts from ANDI such as
custom data-andi508-* attributes and ANDI508-* CSS
classes will appear on elements in the test page but should not affect test page functionality.
Limitations
Dynamic Content
If an area on the Test Page changes dynamically (e.g. clicking on something opens up a submenu or alters screen text), ANDI will not know that the page has changed. To test the updated content, simply refresh ANDI and inspect the newly displayed area.
The Active Element will be retained on refresh, and the components, output, and alerts, will be updated. This provides a way to test dynamically changing properties such as the current state of a table column sorter or an expand/collapse controller.
Frames/iFrames
When ANDI detects frames or iframes on the page, it offers the ability to test the frames and iframes independently in a new window.
Shadow DOM
Currently, ANDI does not recurse into Shadow DOM trees. Therefore, content within Shadow DOMs cannot be tested with ANDI at this time.
Manipulation of the Test Page DOM
ANDI minimizes the manipulation of the test page DOM,
however certain alterations must be made.
To some elements ANDI may add data-* attributes and some
CSS classes.
These attributes and classes include the string "ANDI508".
To elements that have css fixed positions, ANDI will adjust the top or
bottom distance to ensure that the elements are not blocking view of the
ANDI Bar.
When the Close button is pressed,
ANDI will be removed from the page along with
all modifications to the elements it touched.
Testing ANDI With ANDI
ANDI cannot be used to test ANDI since it fully removes itself before launch. Nice try though. To test ANDI for accessibility, users will have to revert to archaic methods such as directly looking at the code or listening to a screen reader yap about.